The Schema sectionSchema
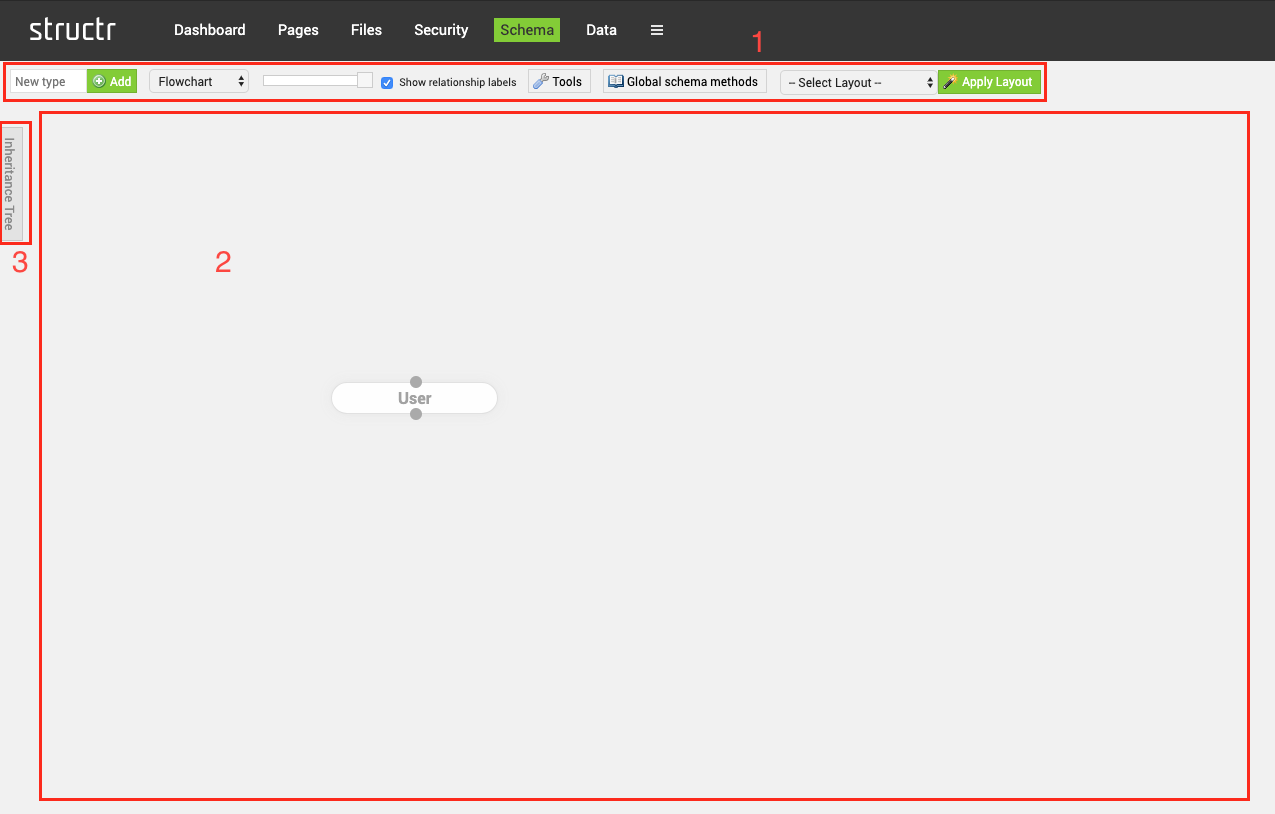
The Schema section is where you can manage the Data Model of the application. It consists of three main parts:
- the menu bar below the main menu
- the scrollable canvas underneath the menu bar
- the inheritance tree tab located at the left side of the canvas.
In the following we will describe these areas in more detail:
Menu Bar
Via the Menu Bar, the user can add new types to the data model, using the Add New Type button (![]() ).
).
Type names must follow a specific naming convention. They must start with an uppercase letter (A-Z) and the rest of the name can only contain uppercase (A-Z) and lowercase (a-z) characters, numbers (0-9) and underscores (_).
If the provided name does not follow the naming convention, an error message is raised. If it follows the convention, the schema view is blocked until it is recompiled. The canvas is then reloaded to reflect the changes.
The Relationship Style Selector (![]() ) controls how relationships are rendered on the canvas. Possible values are
) controls how relationships are rendered on the canvas. Possible values are Flowchart, Bezier, StateMachine and Straight. These options simply control how the relationship arrows are drawn and have no effect other than that.
The Schema Size Slider (![]() ) allows zooming the schema canvas to fit more elements on screen.
) allows zooming the schema canvas to fit more elements on screen.
The Show Relationship Labels Checkbox (![]() ) controls if visual elements for the relationship are shown. Those elements tell the user the name of a relationship and its cardinality. Possible cardinalities are One-to-One, One-to-Many, Many-to-One and Many-to-Many, where a one is marked by a
) controls if visual elements for the relationship are shown. Those elements tell the user the name of a relationship and its cardinality. Possible cardinalities are One-to-One, One-to-Many, Many-to-One and Many-to-Many, where a one is marked by a 1 and a many is marked by an *.
The Tools button (![]() ) opens a dialog with diverse tools, which is documented in the section:
) opens a dialog with diverse tools, which is documented in the section:
And finally, the Global schema methods button (![]() ) opens a dialog where global schema methods can be created/edited. However, this area of the UI isA better place to do this is the Code editor.
) opens a dialog where global schema methods can be created/edited. However, this area of the UI isA better place to do this is the Code editor.
Schema Tools
The schema tools are a collection of utilities for administering the schema and managing it’s visual layout. They are divided into the four areas:
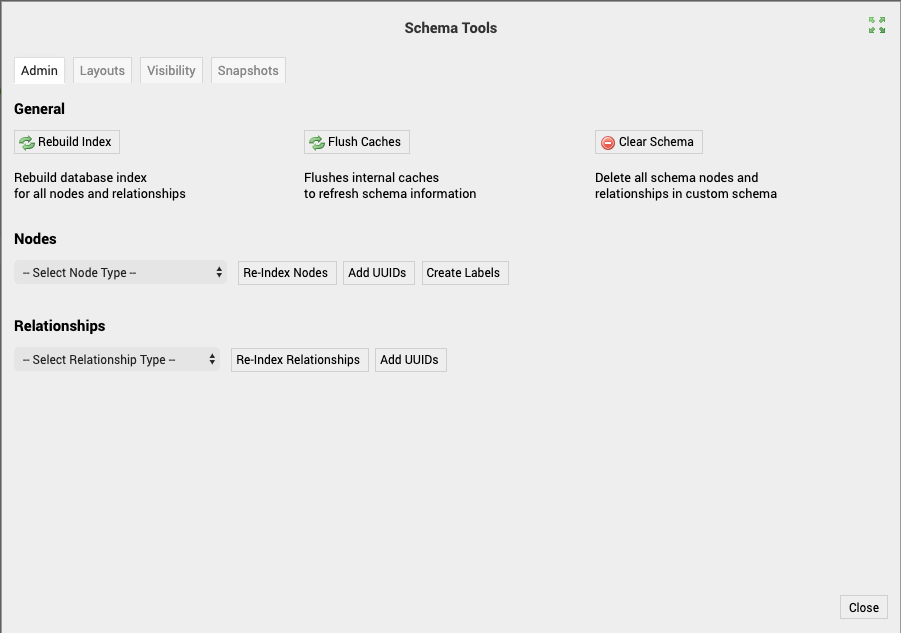
Admin
The admin tools can be divided into three areas:
- Global or general utilities:
| | Globally rebuild database indices. |
| | Flush cached database information. |
| | Clear the entire schema. |
2. Node or type specific utilities (![]() ):
):
| | Rebuild indices for selected types. |
| | Add uuids for selected types. |
| | Create labels for selected types. |
3. Edge or relationship specific utilities (![]() ):
):
| | Rebuild indices for selected relationships. |
| | Add uuids for selected relationships. |
The indices can either be rebuild globally via the Rebuild Index button (![]() ) which rebuilds database indexes for all nodes and relationships, or selectively via the Select Node Type Option (
) which rebuilds database indexes for all nodes and relationships, or selectively via the Select Node Type Option (![]() ) and the Re-Index Nodes button (
) and the Re-Index Nodes button (![]() ), or the Select Relationship Type Option (
), or the Select Relationship Type Option (![]() ) and the Re-Index Relationships button (
) and the Re-Index Relationships button (![]() ).
).
The Flush Caches button (![]() ) button allows clearing the internal caches. This can be helpful if database nodes are deleted via database commands without structrs knowledge, as otherwise this may lead to unexpected behavior or errors.
) button allows clearing the internal caches. This can be helpful if database nodes are deleted via database commands without structrs knowledge, as otherwise this may lead to unexpected behavior or errors.
The Clear Schema button (![]() ) allows you to delete the complete user-defined schema. Only builtin types will remain after this function is executed.
) allows you to delete the complete user-defined schema. Only builtin types will remain after this function is executed.
Note: This exclusively removes schema information. If nodes/relationships were created using this schema they will still exist in the database afterwards.
Finally, the Add UUIDs button (![]() ) adds UUIDs to the selected node/relationship types (or all nodes/relationships if selected). And likewise, the Create Labels button (
) adds UUIDs to the selected node/relationship types (or all nodes/relationships if selected). And likewise, the Create Labels button (![]() ) sets the correct labels for the selected node types (or all nodes). This can be necessary if the type inheritance hierarchy was changed.
) sets the correct labels for the selected node types (or all nodes). This can be necessary if the type inheritance hierarchy was changed.
Layouts
To help you focus on different aspects of you schema (i.e. different subgraphs of you application) Structr provides so-called schema layouts. The layouts can be managed, via the layouts tab in the Schema Tools. They can be applied via the Apply Layout button (![]() ) as shown below.
) as shown below.
The layout tools allow the creating (![]() ), updating (
), updating (![]() ), applying (
), applying (![]() ), downloading (
), downloading (![]() ) and deleting (
) and deleting (![]() ) of schema layouts. This enables the user to create different layouts for different perspectives on the data model.
) of schema layouts. This enables the user to create different layouts for different perspectives on the data model.
This is simply a visual helper to bring order to the types on the canvas - it has no effect other than that.
Updating and Deleting Configurations is only allowed for saved layouts the current user owns or for those without an owner. Applying and downloading works for all saved layouts to enable sharing between users.
Layouts contain the current settings for relationship rendering, zoom, relationship labels, type placement and type visibility.
Visibility
The visibility tools allow hiding/showing of types. The types are grouped into the 5 categories Custom Types, Core Types, UI Types, HTML Types and Uncategorized Types which each contain a table with all types in that category. Each type in those tables can either be shown or hidden. Using the Toggle Visibility Checkbox (![]() ) in the header of each table you can select or deselect all checkboxes in the whole table which sets the types to visible or hidden, similarly clicking the Toggle Type Visibility Icon (
) in the header of each table you can select or deselect all checkboxes in the whole table which sets the types to visible or hidden, similarly clicking the Toggle Type Visibility Icon (![]() ) inverts the current selection of checkboxes.
) inverts the current selection of checkboxes.
Note: Depending on the previous layouts and the size of you browser window, the schema types may be rendered outside of the visible canvas. By scrolling horizontally or vertically you can see the nodes.
![]()
Snapshots
The snapshot tool allows creating snapshots. By default the Create Snapshot button (![]() ) takes a snapshot of the complete schema definition as a JSON document and puts it in the folder configured in structr.conf as
) takes a snapshot of the complete schema definition as a JSON document and puts it in the folder configured in structr.conf as snapshot.path (default = snapshots/ underneath the installation path).
If one or more node type is selected (highlighted) in the schema canvas, only the selected type(s) are exported into the snapshot. After creating a snapshot, the list of snapshots will be refreshed.
Each snapshot in the list can be downloaded by clicking on the name. It can also be restored by clicking on the Restore Snapshot button (![]() ).
).
Using the Add Snapshot button (![]() ) the corresponding snapshot will be added to the current schema. The Delete Snapshot button (
) the corresponding snapshot will be added to the current schema. The Delete Snapshot button (![]() ) deletes the snapshot file completely. And finally, the Refresh Snapshots button (
) deletes the snapshot file completely. And finally, the Refresh Snapshots button (![]() ) refreshes the list of snapshots - this is helpful if a snapshot is placed manually in the snapshots folder.
) refreshes the list of snapshots - this is helpful if a snapshot is placed manually in the snapshots folder.
Note: It may be necessary to manually refresh the schema page after a snapshot has been restored or added.

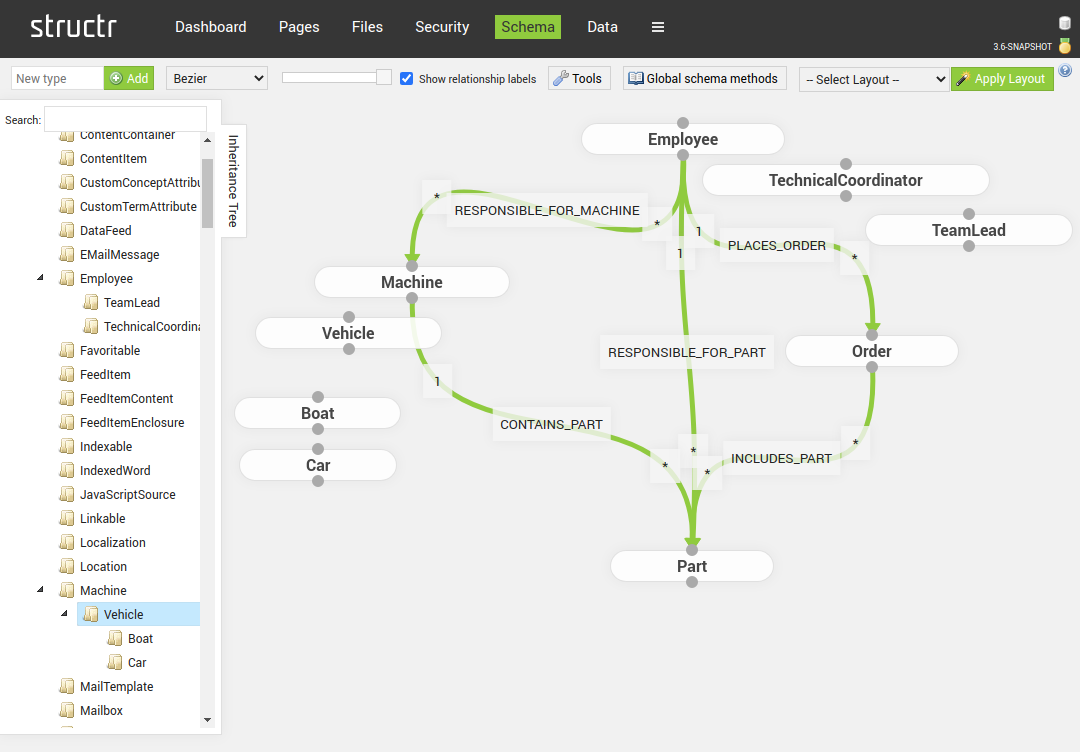
Canvas
The canvas displays the node types and relationship types. By default only the User type is shown. Newly created types are also shown by default. Other types can be shown using the visibility settings in the Schema Tools Dialog (![]() ). Types can be moved using simple drag and drop. Clicking on the canvas and dragging the mouse opens a selection which allows the user to select multiple types. Dragging and dropping one of those types moves all selected types.
). Types can be moved using simple drag and drop. Clicking on the canvas and dragging the mouse opens a selection which allows the user to select multiple types. Dragging and dropping one of those types moves all selected types.
Type names of custom types can be changed by clicking on the text of the type node. When hovering over the type node the context icons are made visible. The Edit button (![]() ) opens the details dialog for the type and the Delete button (
) opens the details dialog for the type and the Delete button (![]() ) allows deleting the type after a confirmation.
) allows deleting the type after a confirmation.

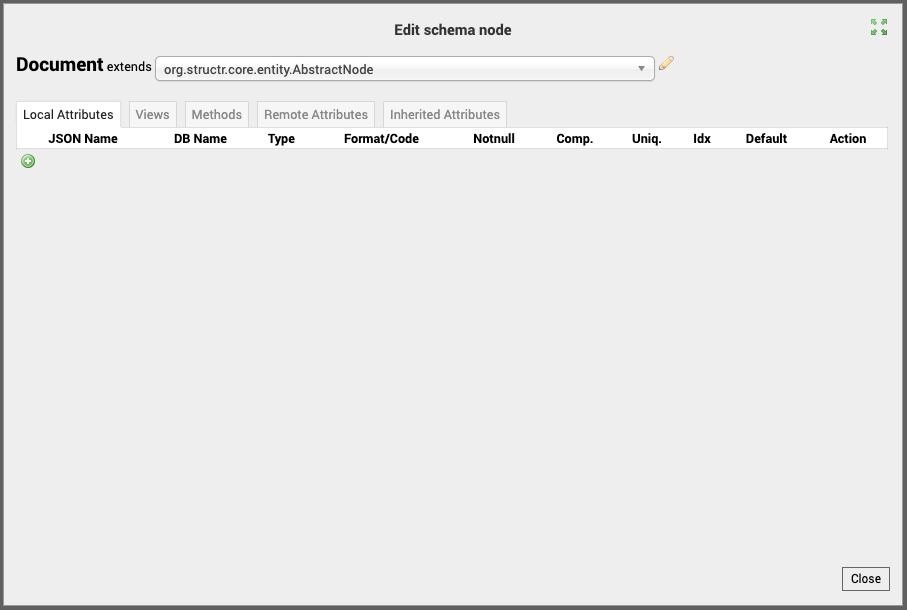
Type Details Dialog
At the top of the details dialog the name of the (custom) type can be edited by clicking on the current name. The inheritance hierarchy can be changed using the selector.
There are 5 tabs where the functionality of the type can be configured:
-
Local Attributes
A Custom Type can be extended with dynamic properties to provide the data model for the intended use-case. This list contains all local properties (meaning they are defined on this type directly). -
Views
The properties of a type can be combined into named Views, which are accessible under an individual REST URL. Access to these URLs can be configured independently for each HTTP method using Resource Access Grants, which makes them an ideal tool to create specialised endpoints for different client applications (e.g. mobile clients etc.). -
Methods
There are different kinds of methods - callback methods and entity methods. Callback methods are automatically executed by the framework upon certain lifecycle events and have a strict naming convention. Entity methods are called by the user/programmer.
Entity methods are not automatically run by the framework and must be called manually. This either means making a POST request to/structr/rest/<Type>/<UUID>/<methodName>or in serverside JavaScript as<node>.<methodName>(); -
Remote Attributes
Custom types can be linked to other types, including base types. Structr will automatically create Remote Attributes on either side of the link, which can then be used to create, update or remove the relationships between instances of the two types. In this tab the configuration of the remote attributes can be viewed and edited. The names configured here are used throughout the application to refer to the other side of the relationship(s). -
Inherited Attributes
The content of this tab is of informative character. All inherited attributes are shown with an information from where it was inherited.
Relationships between types can be created by dragging from the bottom circle of the source type to the top circle of the target type.
When hovering over the text label of relationship, the context icons are made visible. The Edit button (![]() ) opens the detail popup for the relationship and the Delete button (
) opens the detail popup for the relationship and the Delete button (![]() ) allows deleting the relationship after a confirmation.
) allows deleting the relationship after a confirmation.
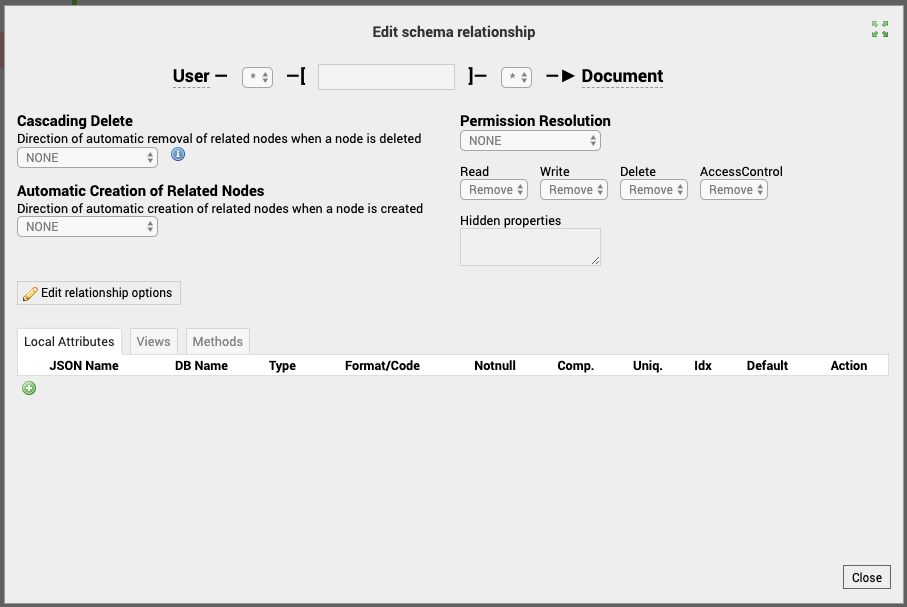
Relationship Details Dialog
By default, the fields in the properties of the dialog are write protected. To enable editing the fields of the relationship, you must click the Edit Relationship Options button (![]() ). The top-most row of the dialog allows the configuration of the source and target cardinality as well as the name of the relationship. Cardinalities are specifies either as
). The top-most row of the dialog allows the configuration of the source and target cardinality as well as the name of the relationship. Cardinalities are specifies either as one (1) or many (*).
The Cascading Delete settings allow configuration of what happens when either end of the relationship is deleted. The possible values are explained in-depth in the help popup in the dialog.
Automatic Creation of Related Nodes configures if it is allowed to include nested nodes in a REST POST request for this relationship. A node with the given property set is automatically created and linked to the node. If the nested node contains an id attribute (or another property marked as unique) a node is searched for that property and linked if found.
Permission Resolution allows configuration of rights propagation in the graph. If NONE is selected, no rights propagation is applied for this relationship. If SOURCE_TO_TARGET is selected the rights are propagated along the relationship direction to the next node. For TARGET_TO_SOURCE the rights propagation is works against the relationship direction. For ALWAYS the direction of the relationship does not matter and rights propagation is always applied.
Specific rights (Read, Write, Delete, AccessControl) can be added, kept or removed according to the propagation configuration. If a user has read rights to the previous node and Read is configured to Keep, the user also has read rights for the next node. (Specific User/Group rights are applied before using permission propagation - i.e. if a user has specific rights configured for a node, permission resolution is not evaluated as user rights are more specific).
Along the way of permission propagation, properties can be hidden in order to hide sensitive information from users who get rights from permission propagation. The property names can be separated by comma , or space character.
There are 3 tabs where the functionality of the type can be configured:
Local Attributes
A Custom Type can be extended with dynamic properties to provide the data model for the intended use-case. This list contains all local properties (meaning they are defined on this type directly).Views
The properties of a type can be combined into named Views, which are accessible under an individual REST URL. Access to these URLs can be configured independently for each HTTP method using Resource Access Grants, which makes them an ideal tool to create specialised endpoints for different client applications (e.g. mobile clients etc.).Methods
There are different kinds of methods - callback methods and entity methods. Callback methods are automatically executed by the framework upon certain lifecycle events and have a strict naming convention. Entity methods are called by the user/programmer.
Entity methods are not automatically run by the framework and must be called manually. This either means making a POST request to/structr/rest/(Type)/(<a data-id="7c9c8218bced42bab66868373e64d885" class="mention">UUID</a>)/(methodName)or in serverside JavaScript asnode.methodName();
Inheritance Tree
The Inheritance Tree shows the hierarchical relationship between all existing types - built-in and user-defined. It can be loaded by clicking on the Inheritance Tree tab. The width of the tree can be altered by dragging the tab element to the left or right.
The search box above the tree can be used to search for type names. When hovering over a type in the tree, the pencil symbol opens the type details popup. The delete button allows deleting the type. (Builtin types are restored upon schema compilation - only customizations are removed)
The tree is automatically reloaded to reflect changes in the type hierarchy (see. Type details popup)