How to import dataData Import
This chapter covers the following topics:
Prerequisites
Before you can import data into Structr, you need to define a schema. Structr can only access and manage objects that it can identify (using a UUID in the id property) and map to a type in the schema (using the type property).
Data Modeling
The schema should be kept as close as possible to the attributes and relationships that the objects have in the real world. There are some very basic rules you can use to determine whether an object should be modeled as a node, a relationship or a property.
Nodes
Most things that you would use a noun to describe.
- real-world objects like people, companies, documents, products
- abstract objects that are distinct entities with a unique identity and one or more attributes
- properties that several objects can have in common, like an address or a category
- collections of property values (the items of a list, etc.)
- relationships between more than two objects (hyper-relationships)
Properties
Most things that you would use an adjective to describe.
- single values like an ID, a name, a color, etc.
- time or date values (if you are not using a time tree index)
Relationships
Most things that you would use a verb to describe.
- relationships between objects that are not based on a single property
- actions or activities
- facts
Import from CSV
You can import CSV data in two different ways:
- with the simple import dialog in the Data section
- with the CSV Import Wizard in the Files section
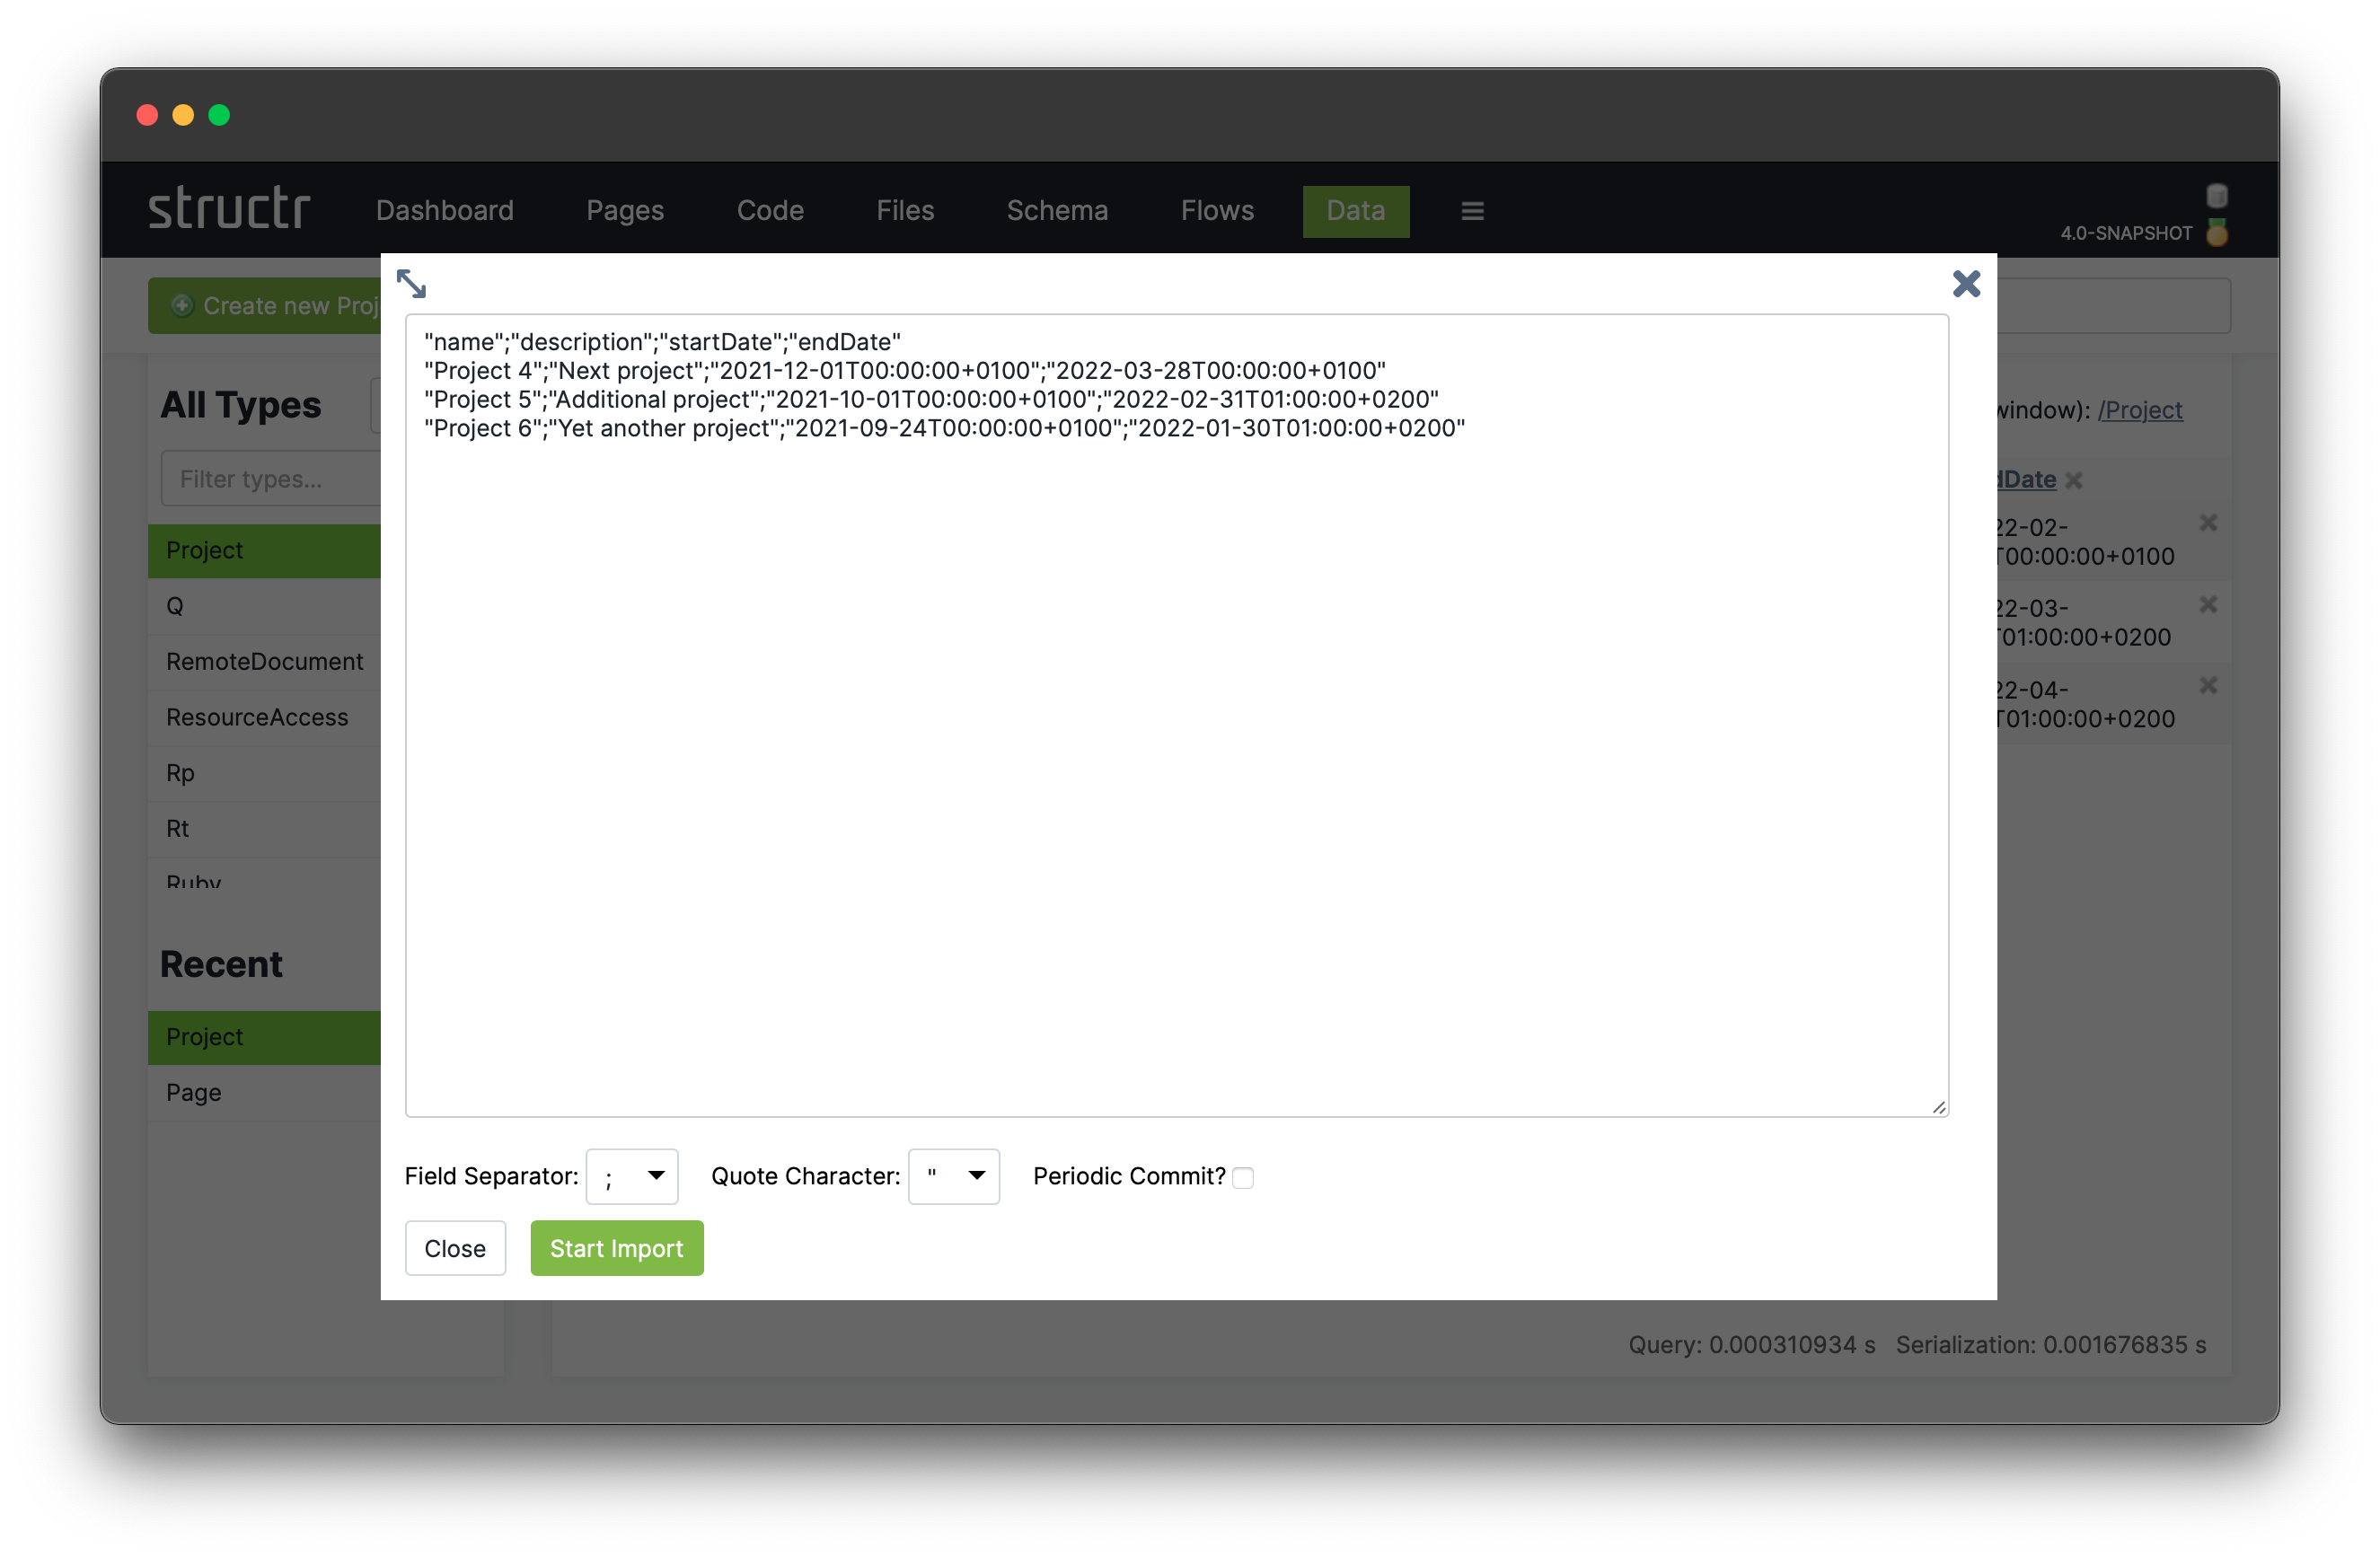
Simple Import Dialog
The simple CSV import dialog in the Data section is a tool to quickly import a limited dataset, based on very simple rules. The import is limited to a single type, the input can have a maximum size of 100,000 characters, and the columns in the CSV file must exactly match the property names of the target type. If you need more options, you can use the CSV Import Wizard in the Files section.
Import Wizard
The CSV Import Wizard allows you to import large and complex CSV files by mapping fields from the input document to properties of one or more schema types. You can also use a transformation function to modify values before the importing. The wizard recognizes fields with similar or identical names in the data to be imported and automatically selectes the corresponding target field in the data model.
The import wizard can be found in the Files section, because it is based on files in Structr Filesystem. This means that you need to upload the CSV file to Structr before you can import the data. The reason for that is that it is not possible to handle large amounts of data using copy & paste in your browser.
Once you uploaded a CSV file, you can open the Import Wizard by clicking on the CSV Import button (![]() ).
).
The Import Dialog
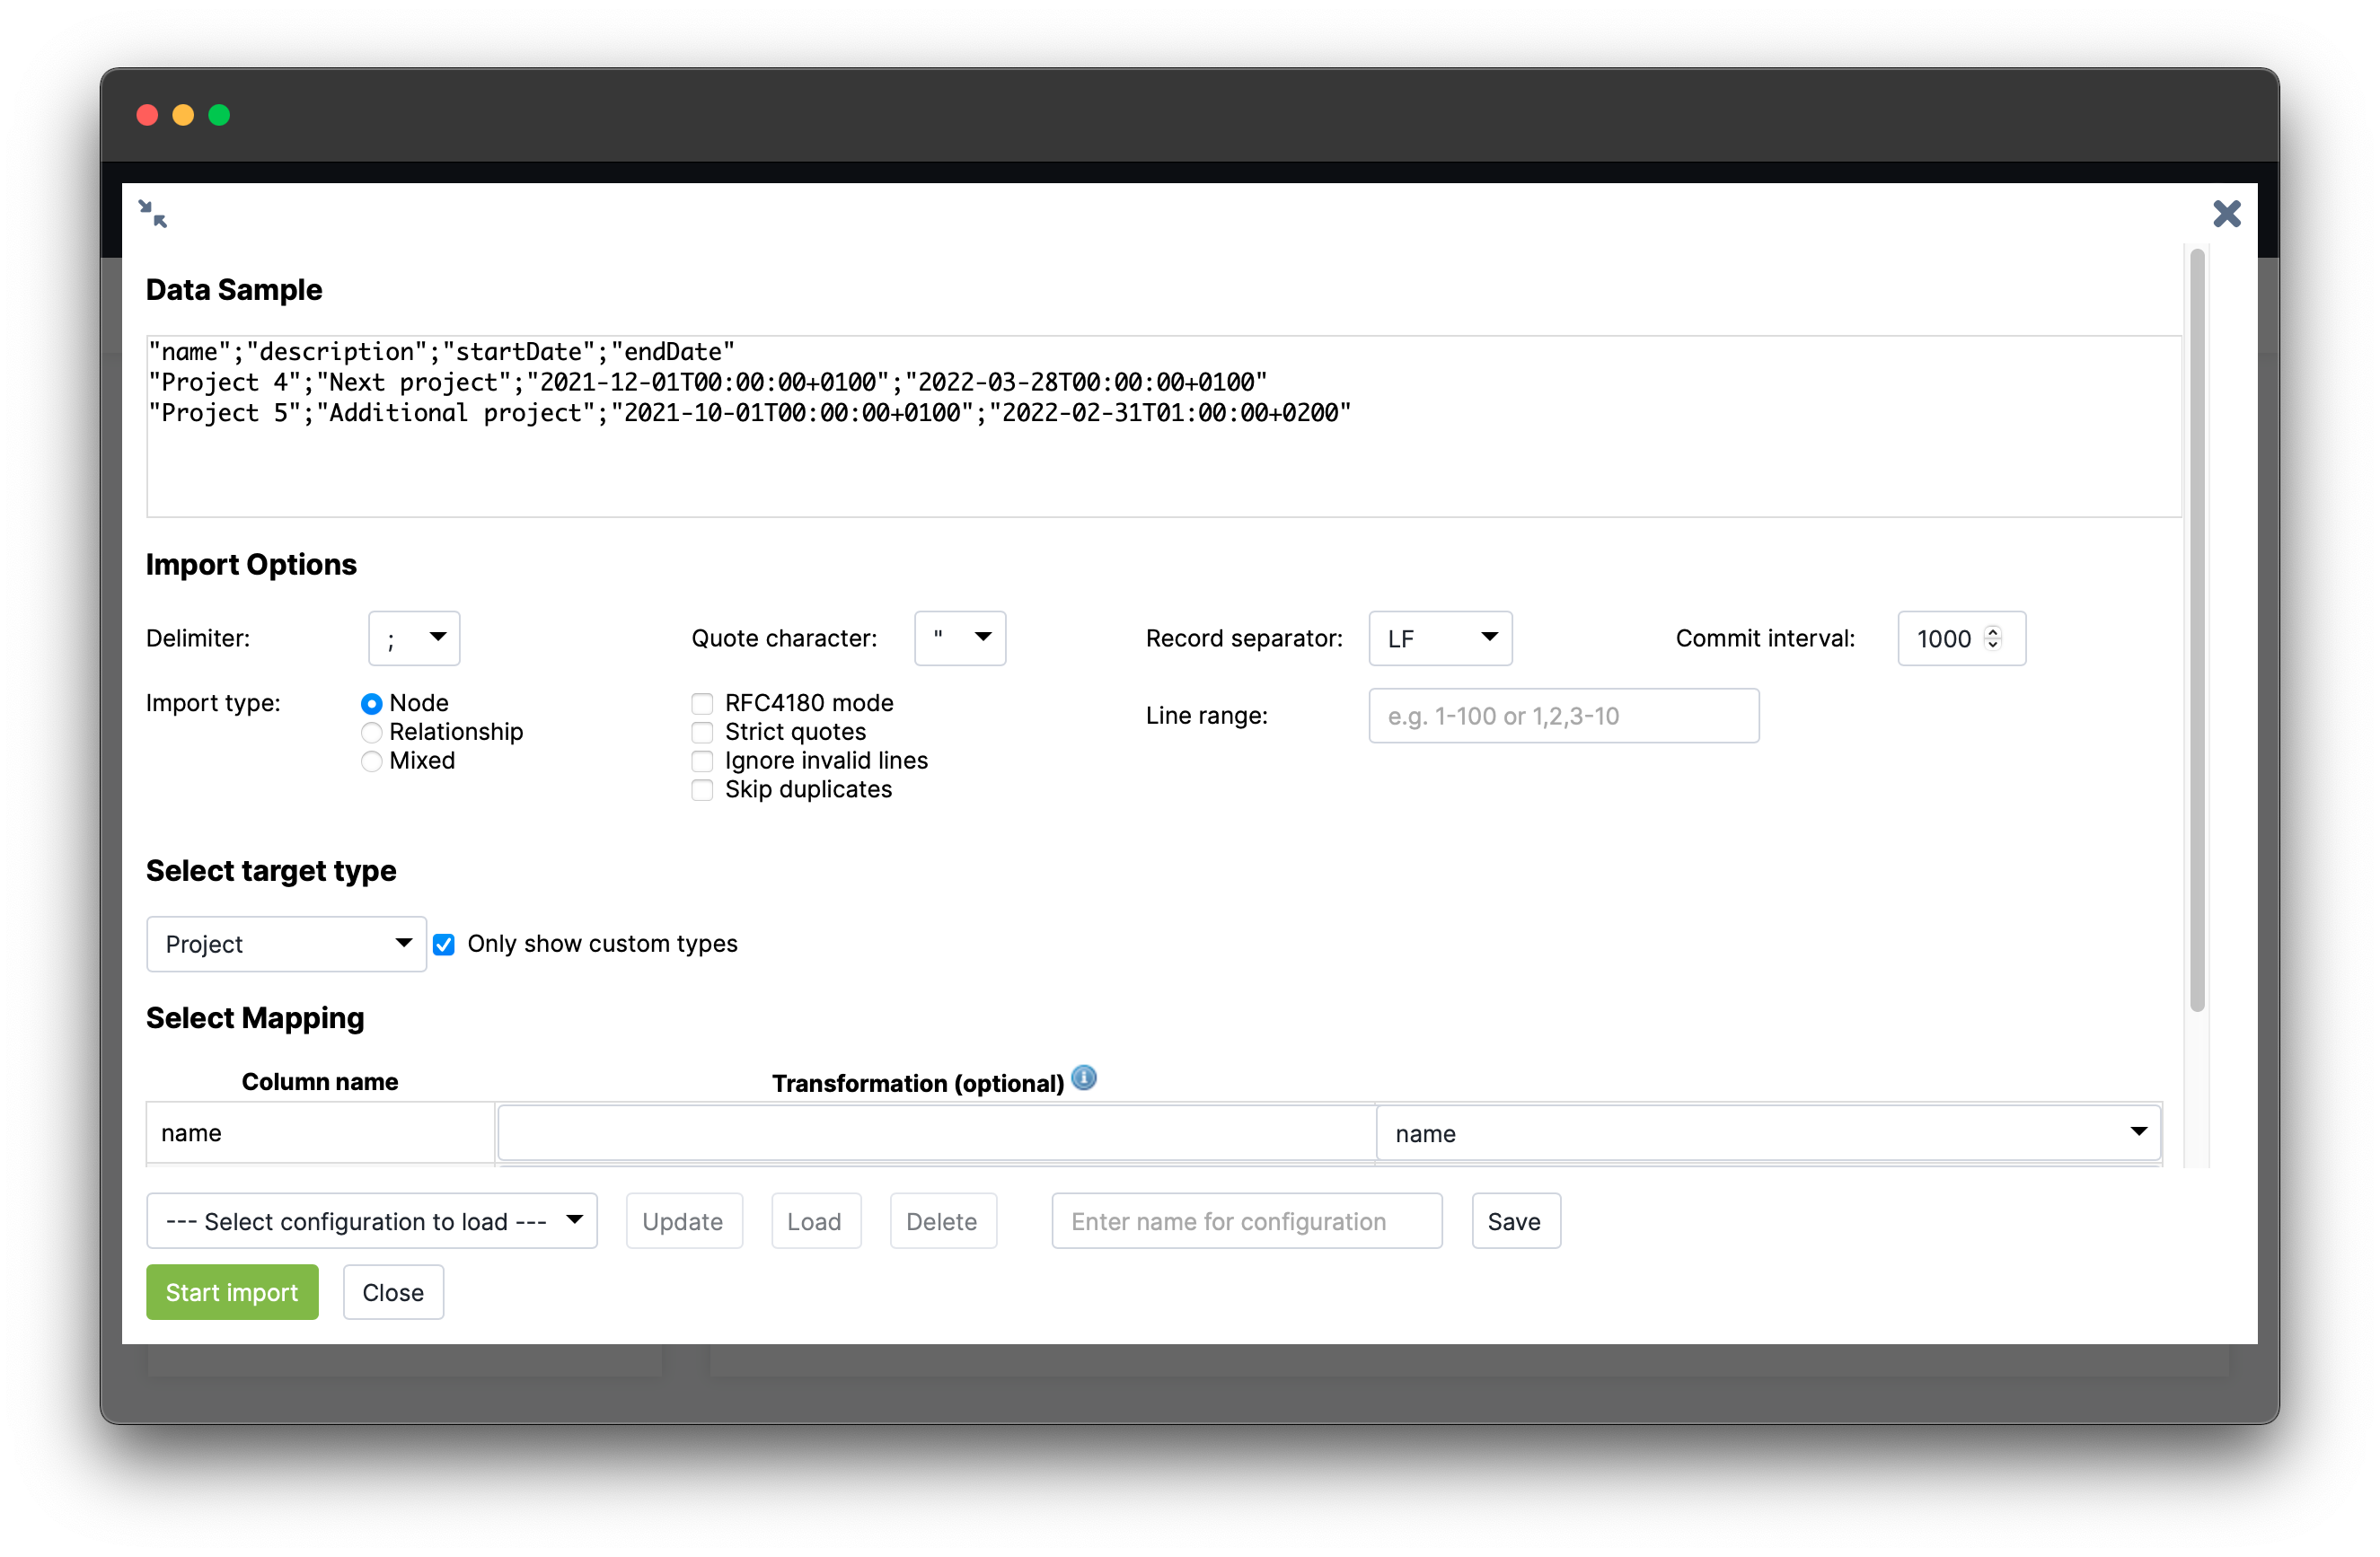
Data Sample
The Data Sample area shows the first few lines of the CSV file so you can select the correct import settings (delimiter, quote character etc.)
Import Options
The import options allow you to configure the importer for your data. The delimiter can be set to either , or ;, the optional quote character is needed for quoted CSV, and the record separator can be set to “line feed” (LF), “carriage return” (CR) or both. If you are not sure what to choose here, just use the default.
Commit Interval
The commit interval setting tells the importer how many objects will be imported in a single batch. If your CSV file contains 10,000 entries, it will be imported in 10 batches of 1,000, with a batch being the number of objects that are written in a single transaction.
Import Type
The import type setting determines the available options in the target type select box below. If you select “Node”, you will see a list of existing node types in the target type selection box. If you select “Relationship”, you will only see relationship types, and if you select “Mixed”, you will enter a separate configuration mode that is described below.
The other configuration options are special settings that allow you to fine-tune the import if something goes wrong. You can for example restrict the number of imported rows to get around an erroneous entry.
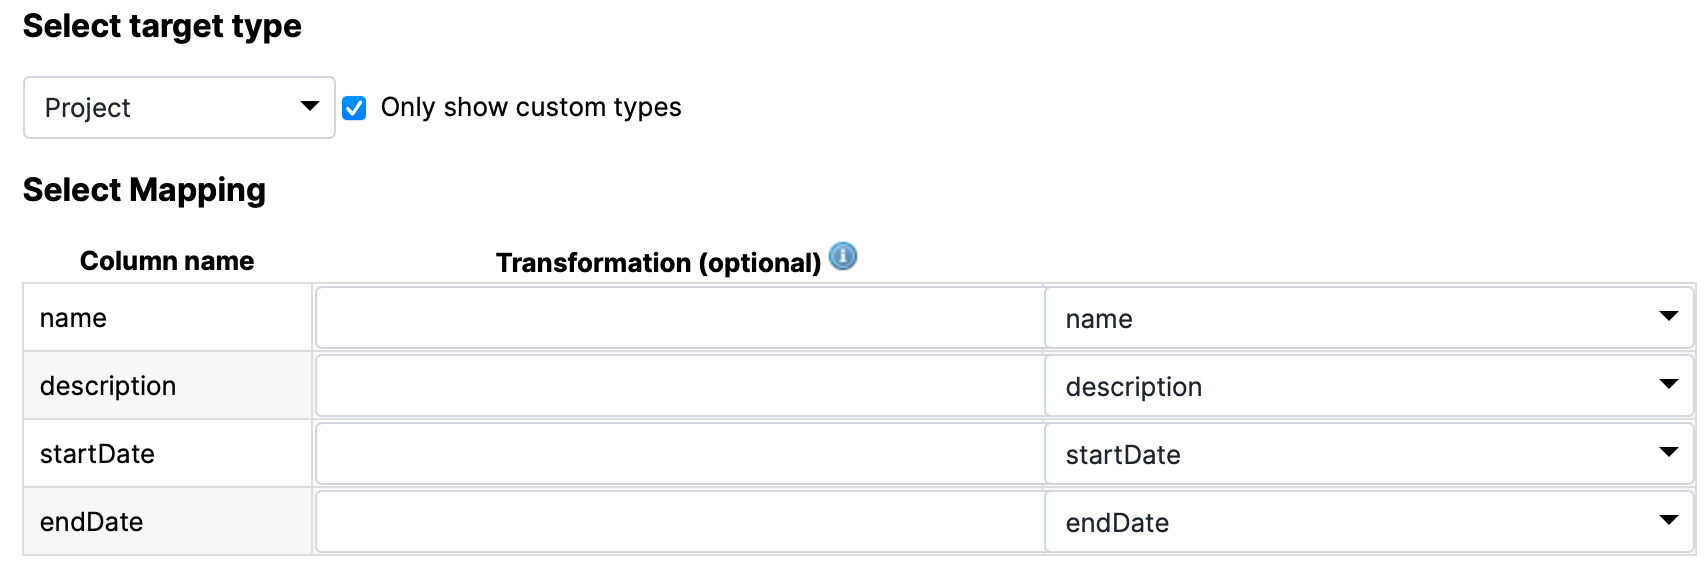
Select Target Type
In the select target type box, you can select a target type for your data. After a target type is selected, the import wizard displays a table that allows you to configure the mapping from input column to target property.
Start Import
When you are finished configuring the mapping between CSV columns and properties, you can click the “Start Import Button” to start the import. Structr will show status update notifications for the import progress in the upper right corner.
Mixed Import Mode
The Mixed Import Mode is a special mode that allows you to distribute the input from a single row to several different data types and relationships. It requires the data model to contain relationships between the types and allows you to use these relationships automatically. Please not that this is a very experimental feature that is very likely to change in the future.
Storing Import Configurations for later
At the bottom of the CSV import dialog is a row of buttons that allow you to save the current configuration and to load or delete a saved configuration. If a saved configurations exist, you can select one from the list and click the “Load” button to restore the saved settings.
Import from XML
Structr also offers an import wizard for XML documents, with a configurable mapping of XML structures to database objects. The XML Importer allows mapping of XML attributes to fields of the data model, but also allows mapping of entire XML elements (tags) to schema types. A nested object structure stored in an XML element can be transferred directly to a corresponding graph structure. The same applies to RDF triples stored in an XML document; these can be imported very easily with the appropriate data model.
The Import Dialog
The following screenshot shows the import dialog for an XML file that contains a sample customer database. You can see and navigate the document structure on the left side, and configure the mapping actions on the right.
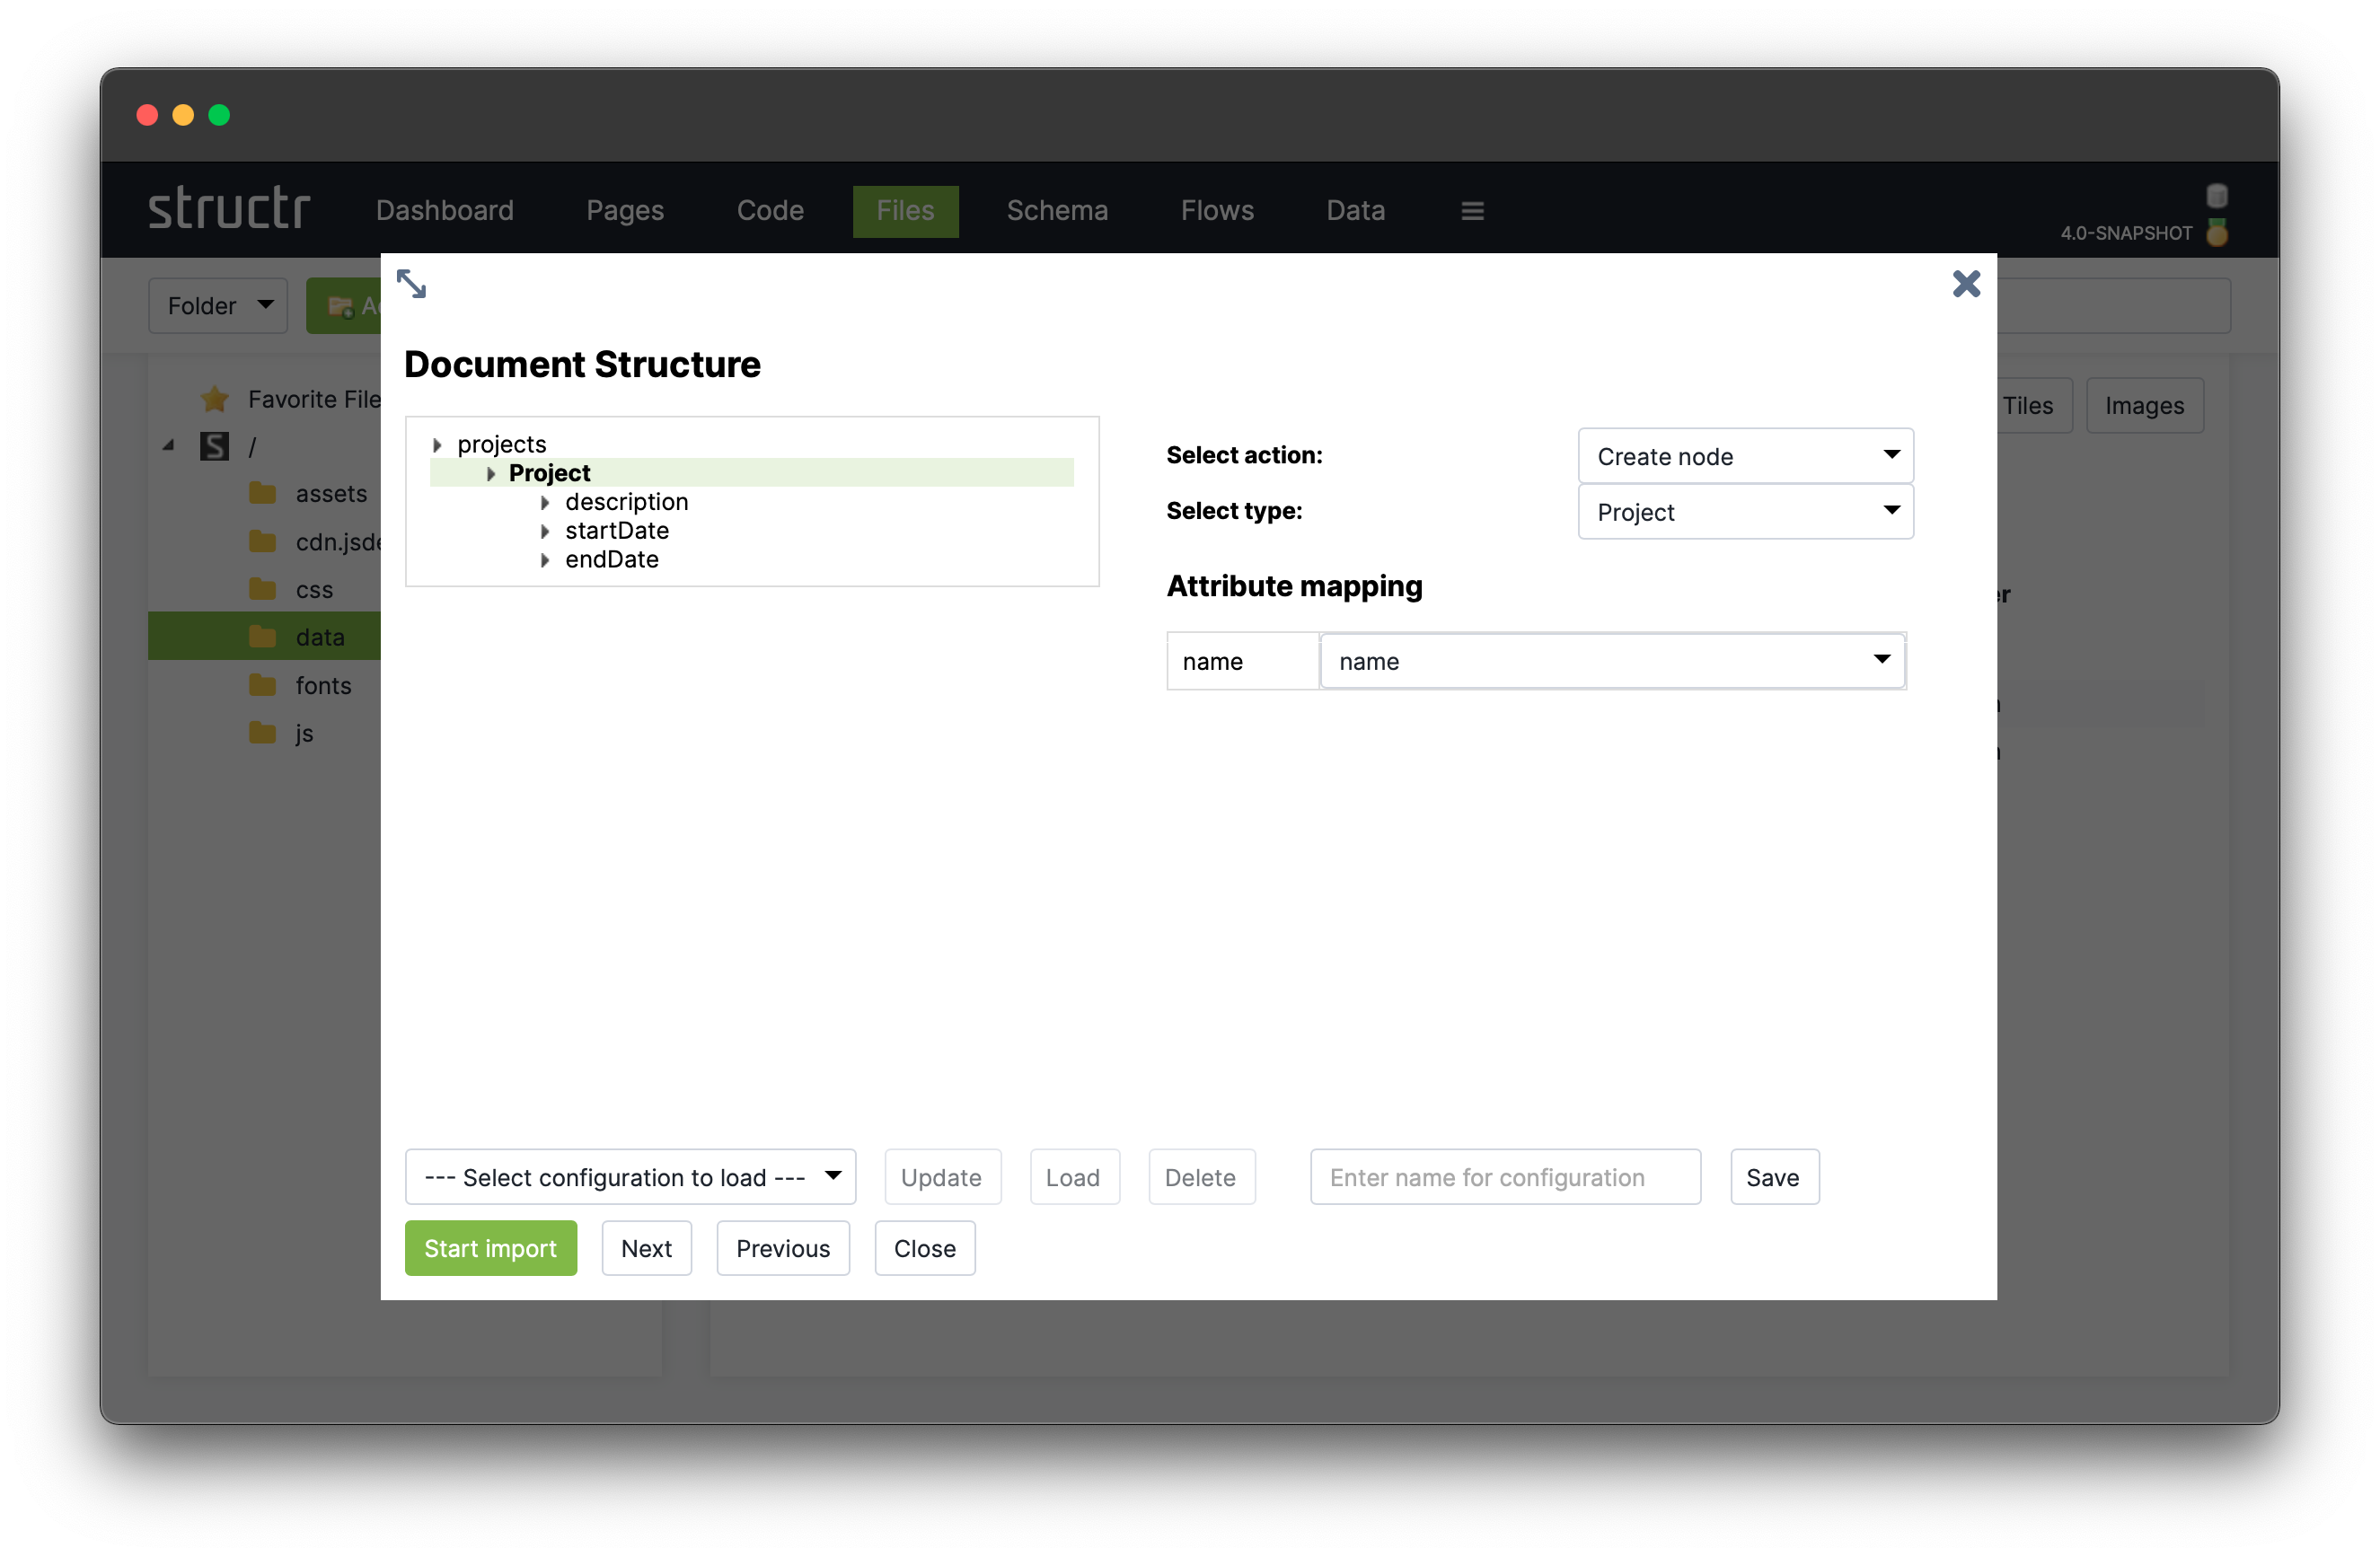
You can click on an element in the structure of the XML file to select one of the following actions.
- create a node
- set a property on a node that was created on a higher level
- skip this element
- ignore the whole branch
Create Nodes
If you select Create node, you will see a select box with a list of target types to choose from. The importer will create a new node of the selected type whenever it encounters a matching XML element in the input document. If the XML element has attributes, you can assign a target attribute from the selected type, like originId for the CustomerID attribute.
Set Properties
The Set property action allows you to import the text content of an element into a property of a schema type. If you select this action, you will see a select box with the properties of the target type you chose for the enclosing element.

If the element has attributes you want to import, you should consider using the Create node action instead.
Create Connected Nodes
If you select the Create node action for an element that is inside another element with the Create node action, the importer will create a relationship between the two based on the schema configuration. In this example, we select the target type CustomerAddress for the <FullAddress> element inside the <Customer> element, and the import wizard shows the contextual property addresses.
Start Import
When you are finished configuring the import mapping, you can click the “Start Import Button” to start the import. Structr will show status update notifications for the import progress in the upper right corner.
Storing Import Configurations for later
At the bottom of the XML import dialog is a row of buttons that allow you to save the current configuration and to load or delete a saved configuration. If a saved configurations exist, you can select one from the list and click the “Load” button to restore the saved settings.
To save the current configuration you can enter the desired name in the input field next to the “Save” button and click “Save”.
Import JSON
Since Javascript Object Notation (JSON) is the default format for all data going over the REST interface, you can import JSON data very easily using REST. You can find more information about that in the REST Guide and in the REST API section of the Fundamental Concepts document.
Create Nodes
To create data in Structr, you can use the HTTP POST verb with a JSON document in the request body. The target URL for the POST request is determined by the type of object you want to create. Structr automatically creates corresponding REST Endpoints for all types in the data model and makes them available under /structr/rest/<Type>. In the following example, we create a new Project node, so the REST URL is /structr/rest/Project, which addresses the Collection Resource for that type.
Request
$ curl -HX-User:admin -HX-Password:admin http://localhost:8082/structr/rest/Project -XPOST -d '{
    "name": "Project #1",
    "description": "My first project"
}'
The request body can contain any property that is defined in the data model for the given type. Structr will add some internal properties to the node once it is created, especially the UUID and the type property.
Response
{
        "result": [
                "46b4cbfce4624f4a98578148229b77c2"
        ],
        "result_count": 1,
        "page_count": 1,
        "result_count_time": "0.000333649",
        "serialization_time": "0.001035385"
}
You can see that Structr has created a new object and assigned a UUID, which you can use to make a second request to the Entity Resource.
Result
$ curl -HX-User:admin -HX-Password:admin http://localhost:8082/structr/rest/Project/46b4cbfce4624f4a98578148229b77c2
{
        "result": {
                "name": "Project #1",
                "type": "Project",
                "id": "46b4cbfce4624f4a98578148229b77c2",
                "description": "My first project"
        },
        "query_time": "0.004160732",
        "result_count": 1,
        "page_count": 1,
        "result_count_time": "0.000097147",
        "serialization_time": "0.000428520"
}
Create Relationships
In most cases, relationships in the database can be managed automatically by Structr, using Contextual Properties. A contextual property is a property that manages the association between two objects. In the following example, the tasks property on the type Project is such a property.
Contextual properties use information from the data model to automatically create relationship in the database when objects are assigned.
You can manage the relationships between a project and its tasks by simply assigning one or more tasks to the project.
Request
$ curl -HX-User:admin -HX-Password:admin http://localhost:8082/structr/rest/Project -XPOST -d '{
    "name": "Project #2",
    "description": "Another project",
    "tasks": [
        {
            "name": "Task #1",
            "description": "The first task of this project"
        },
        {
            "name": "Task #2",
            "description": "Example Task"
        }
    ]
}'
Result
You can examine the result of the two operations above by making a GET request to the Projects Collection Resource.
$ curl -HX-User:admin -HX-Password:admin http://localhost:8082/structr/rest/Project?sort=name
{
        "result": [
                {
                        "name": "Project #1",
                        "type": "Project",
                        "id": "46b4cbfce4624f4a98578148229b77c2",
                        "description": "My first project",
                        "tasks": []
                },
                {
                        "name": "Project #2",
                        "type": "Project",
                        "id": "897a3ad3b2b8441f898d41a1179a06b7",
                        "description": "Another project",
                        "tasks": [
                                {
                                        "id": "960f8b7acde14528a14bdcc812500eef",
                                        "type": "Task",
                                        "name": "Task #1"
                                },
                                {
                                        "id": "0ea250b7743b46ed9b7e24411caafe06",
                                        "type": "Task",
                                        "name": "Task #2"
                                }
                        ]
                }
        ],
        "query_time": "0.000090662",
        "result_count": 2,
        "page_count": 1,
        "result_count_time": "0.000092554",
        "serialization_time": "0.000454289"
}
Please note that this example needs the setting “Automatic Creation of Related Nodes” to be active on the relationship between Project and Task to work.
If you want to create a relationship between two objects directly, you can use the Collection Resource for the corresponding relationship type and provide the UUIDs of the source and target nodes in the sourceId and targetId properties of the request. This allows you to set properties on the relationship object.
Learn More
If you want to learn more about the REST API, please read the REST Guide or the section about the REST API in the Fundamental Concepts document.
Using Scripting to create data
The Structr Scripting Engine provides a number of built-in functions to create, modify and delete nodes and relationships in the database.
Create Nodes
To create nodes in a scripting environment, you can use the create() function. The create function uses a syntax very similar to the request body of a REST POST request as shown in the following Javascript example.
${{
    // create new project
    let newProject = $.create('Project', {
        "name": "Project #1",
        "description": "My first project"
    });

    // change the description
    newProject.description = "This project was updated.";
}}
After creating the object, you can use it in your script as if it were a normal object. You can use dot-notation to read and write properties, and you can even assign other objects like in the next example.
Create Relationships
To create relationships in a scripting environment, you can use the contextual properties that were introduced in the JSON section above. In the example below, we create a Project and two Task objects and use the contextual attribute tasks to let Structr create the relationships.
${{
    // create new project
    let project = $.create('Project', {
        "name": "Project #2",
        "description": "My second project"
    });

    let task1 = $.create('Task', { "name": "Task #1" });
    let task2 = $.create('Task', { "name": "Task #2" });

    project.tasks = [ task1, task2 ];
}}
Contextual properties use information from the data model to automatically create relationship in the database when objects are assigned.
Import from Webservices
Structr provides a number of built-in functions to access external data sources and transform the data: GET, PUT, POST, from_csv, from_json, from_xml. You can then use JavaScript to process the results and create objects using the create() function mentioned in the previous section.
The following example shows how to use built-in functions in a schema method to consume a webservice and process the results.
{
    let url  = "https://example.datasource.url/customers.json";
    let json = $.GET(url, "application/json");
    let data = $.fromJson(json);

    data.entries.forEach(entry => {

        $.create("Customer", {
            name: entry.name,
            title: entry.title
        });
    });
}
Using Cypher to create data
You can use your own Cypher queries to create data in the underlying database as long as you make sure that the type attribute always contains the name of the target type in the Structr data model.
Please note that the data will not be visible immediately, because it first needs to be initialized with a UUID and the type labels of the inheritance hierarchy.
To initialize the data for use with Structr, please refer to the next section, “Initializing existing data in Neo4j”.
Existing data in Neo4j
Data in a Neo4j database is available in Structr if the following requirements are met:
- For all data types in Neo4j that should be accessed through Structr, data types must exist in Structr that match the node label. Create these types in the Schema Editor.
- The
typeattribute of every node instance is set to the primary type (=simple class name). This is necessary because Neo4j labels don’t have a reliable order. - Nodes and relationships have an
idString property with a UUID as value. Use the “Add UUIDs” function from Schema section -> Admin -> Indexing. - The primary type (simple class name) as well as the supertypes and implementing interfaces have to be set as labels in Neo4j. Use the maintenance command “Create Labels” from Schema -> Admin -> Indexing to set all necessary labels.
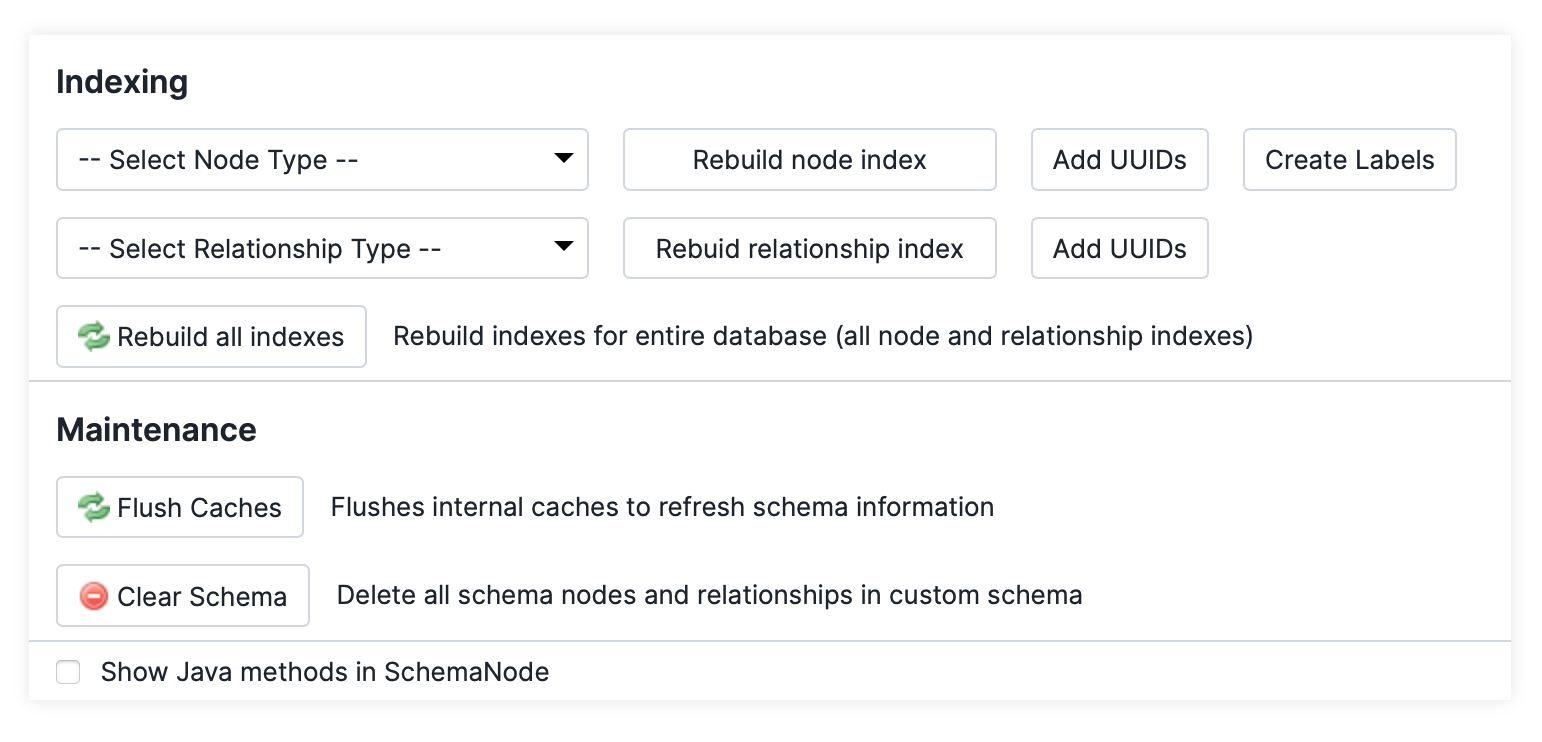
It is recommended to rebuild the index and flush the caches after running the above maintenance commands.
Importing data from JDBC sources
Importing data from a SQL database is possible via the jdbc() function function in the Structr scripting engine. You can execute an SQL query on a server and process or display the result in your application. The code for that is essentially the same as for the “Import from Webservices” example above.
{
    let url   = "jdbc:mysql://localhost:3306/customer";
    let query = "SELECT name, title FROM Customer";
    let data  = $.jdbc(url, query);

    data.entries.forEach(entry => {

        $.create("Customer", {
            name: entry.name,
            title: entry.title
        });
    });
}
You can provide the fully-qualified class name (FQCN) of your preferred JDBC driver as a third parameter to the jdbc() function, and Structr will use that driver to make the connection. Please note that the driver JAR is most likely not shipped with the Structr distribution, so you have to put it in the lib directory of your Structr installation manually.